Initial Project Setup
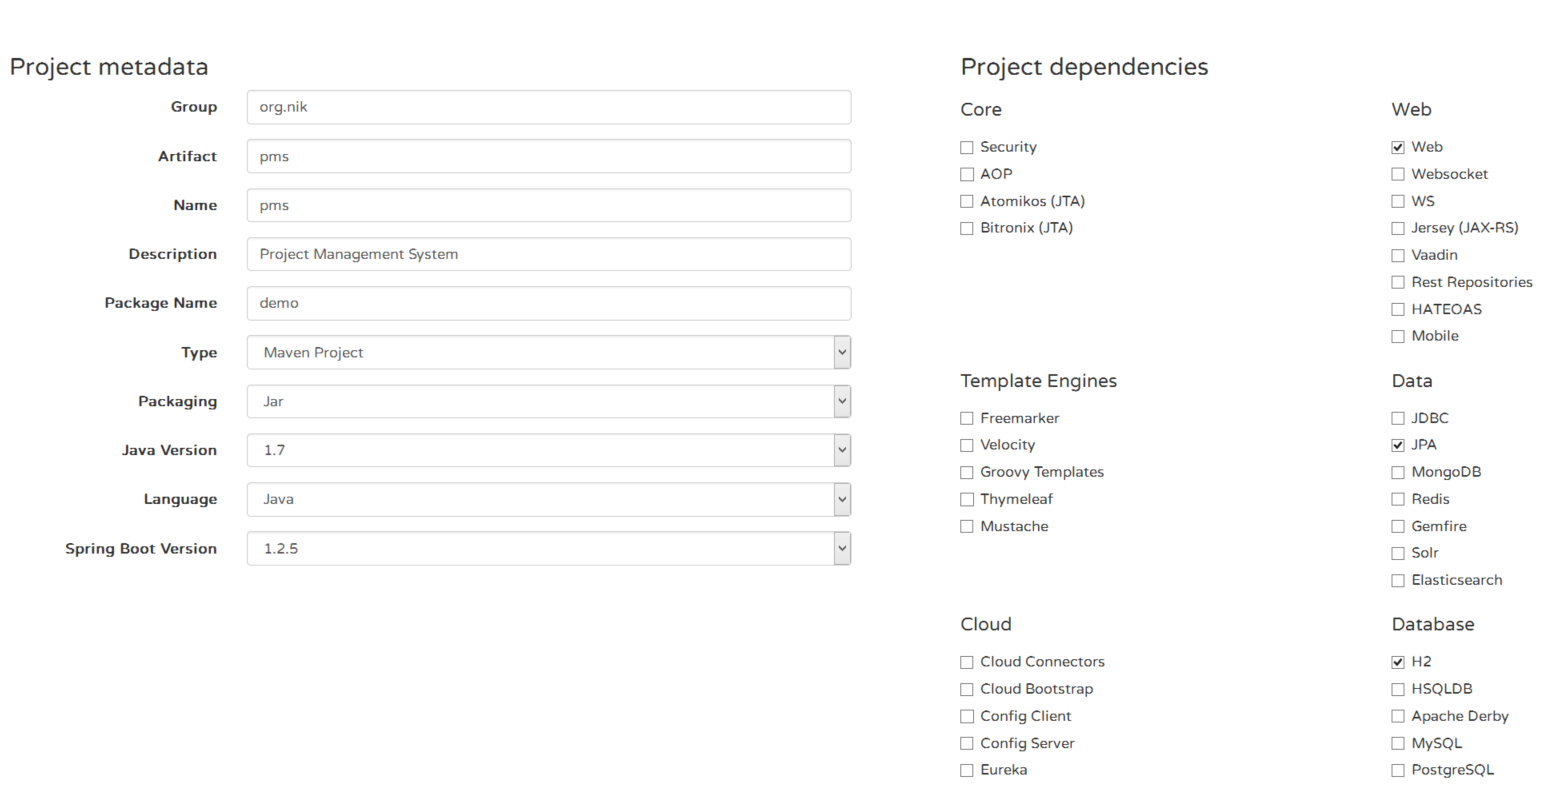
Instead of starting from absolutely nothing, Spring Boot provides a websites that is used to create new projects at Spring Initializr page. It is necessary to fill out the form and then download either a build file or a zipped-up project. For the purpose of this tutorial, let's fill it out as shown in next figure and download ziped-up project.

Extract the downloaded zip file and import the Maven project in your favorite IDE. The POM file should look like the one shown in next code listing.
<?xml version="1.0" encoding="UTF-8"?>
<project xmlns="http://maven.apache.org/POM/4.0.0" xmlns:xsi="http://www.w3.org/2001/XMLSchema-instance"
    xsi:schemaLocation="http://maven.apache.org/POM/4.0.0 http://maven.apache.org/xsd/maven-4.0.0.xsd">
    <modelVersion>4.0.0</modelVersion>

    <groupId>org.nik</groupId>
    <artifactId>pms</artifactId>
    <version>0.0.1-SNAPSHOT</version>
    <packaging>jar</packaging>

    <name>pms</name>
    <description>Project Management System</description>

    <parent>
        <groupId>org.springframework.boot</groupId>
        <artifactId>spring-boot-starter-parent</artifactId>
        <version>1.2.5.RELEASE</version>
        <relativePath/> <!-- lookup parent from repository -->
    </parent>

    <properties>
        <project.build.sourceEncoding>UTF-8</project.build.sourceEncoding>
        <java.version>1.7</java.version>
    </properties>

    <dependencies>
        <dependency>
            <groupId>org.springframework.boot</groupId>
            <artifactId>spring-boot-starter-data-jpa</artifactId>
        </dependency>
        <dependency>
            <groupId>org.springframework.boot</groupId>
            <artifactId>spring-boot-starter-web</artifactId>
        </dependency>

        <dependency>
            <groupId>com.h2database</groupId>
            <artifactId>h2</artifactId>
            <scope>runtime</scope>
        </dependency>
        <dependency>
            <groupId>org.springframework.boot</groupId>
            <artifactId>spring-boot-starter-test</artifactId>
            <scope>test</scope>
        </dependency>
    </dependencies>

    <build>
        <plugins>
            <plugin>
                <groupId>org.springframework.boot</groupId>
                <artifactId>spring-boot-maven-plugin</artifactId>
            </plugin>
        </plugins>
    </build>
</project>
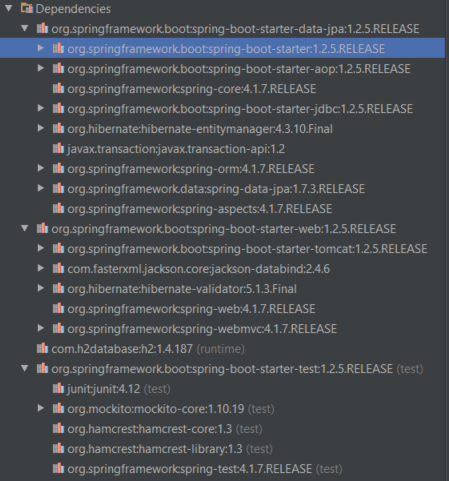
The relevant thing here is <parent> tag - we will be inheriting from Spring Boot parent POM. This inheriting provide us a very useful thing which is a dependency management. It has already defined many artifacts we might find useful to use, together with their recent versions supported by Spring, so it really saves up the hassle of tracking down them ourselves. When it comes to Spring Boot, it's functions are spread between starter modules. They are virtual packages that are deployed to Maven central. Their job is to pull in other dependencies while containing no code on their own. Spring modules and their dependencies are shown in next figure.

The spring-boot-starter is the main module, followed by spring-boot-starter-test which pulls some nice tools for unit testing such as JUnit4 and Mockito. Next comes spring-boot-starter-data-jpa which is responsible for setting up Spring Data JPA and comes bundled with Hibernate. Finally, spring-boot-starter-web pulls Spring MVC dependencies, but also Jackson which will be used for JSON and Tomcat which will act as a embedded servlet container.
H2 will be the database engine, chosen here because it has in memory database feature which is handy for tutorial purpose. Also, please note, that we haven't specified version for these - it is managed by spring-boot-starter-parent for us.
The last thing to notice here is Spring Boot Maven Plugin. This plugin does two thing:
- It provide us with
spring-boot:rungoal for Maven, so the application can be easily run without packaging. - It hooks into
packageMaven goal to produce executable JAR file with all dependencies included.
Also, good practice is to separate application in layers - depending on the function the classes perform in application. We can split our application into three layers:
- Model and DAO (Data Access Object) Layer
- Service Layer
- Web Service Layer
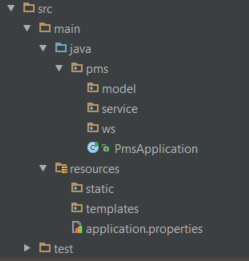
It's usual practice to place the classes from the different layers into distinct and appropriately named packages. So we should make the following packages as shown in next figure.

As we can see - there is exactly one package for each application layer.